Steps
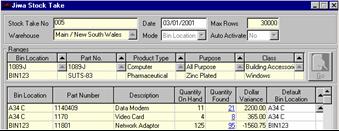
StepsThe Bin Location Mode option is not shown on the stock take form if the Inventory system setting BinLocationMode is N/A (not applicable).
If Bin Location Mode is selected, inventory items are only displayed where bin locations are used for the item (either entered or via a lookup table).
Steps|
1. |
Inventory
|
|
2. |
New Record |
|
3. |
Stock Take Window
|
|
|
Enter the required details in the Stock Take window |
|
4. |
Mode - select Bin Location mode. In Bin Location Mode, Inventory items will only be displayed where bin locations are used |
|
5. |
Ranges - select relevant criteria details for the inventory being counted and reconciled |
|
6. |
Click Go to display the inventory items meeting the criteria range selected and with bin locations |
|
7. |
New lines can be inserted by using Shift + right mouse click on a part number line The Inventory search window is displayed and then the Bin Location search window to select the item to be inserted
|
|
8. |
Modify the default bin location for the inventory item if required |
|
9. |
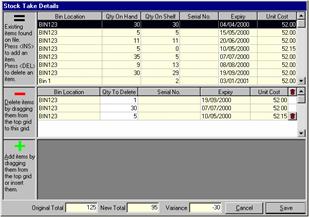
Bin Locations and Serial Numbers Click on the Quantity Found field to display the Stock Details screen |
|
10. |
Add items by: pressing <INS> or dragging the selected existing item from the top grid to the + grid. The quantity to add is entered in the new line in the + grid inserting a new line in the + grid. Enter the quantity to add, serial numbers, and the expiry date (if ‘Use Expiry Dates’ has been selected for the item. Enter the unit cost for the added item When inserting a new line in the + grid, the Bin Location is also entered for the part number |
|
11. |
Delete items by: pressing <DEL> or dragging the selected existing item from the top grid to the - grid. The quantity to delete is entered in the new line in the – grid |
|
12. |
Repeat as required |
|
13. |
Save the Stock Take Details form |
|
14. |
Save the stock take form |
Copyright © 2012 Jiwa Financials. All rights reserved.